Practical Help With Strumming

Rhythmic oscillation can be found everywhere in nature, from cosmic (video) to subatomic scales, and everything in between.

In addition, all known organisms employ biological clocks, and from the moment of conception, mammalian life is in the presence of perceptible biological rhythms such as breathing and circulation.

We are a species of drummers and dancers, moved on a primal level by rhythm and tone.  Soothed by the heartbeat of another.

And yet, since rhythm – in the musical sense – is often more complex than the simple periodicity found in nature, even the most musically-gifted of us can sometimes struggle to master it.

Which brings me to the topic of this post: are you comfortable with rhythmic guitar (particularly: strumming)?

If you’re anything like me (and most beginners), I suspect the answer is ‘no’.

When I first started playing, in blissful ignorance, I gravitated towards a single strumming pattern, happily trying to shoehorn it into every song. I didn’t know when or why that particular pattern lodged itself in the ‘guitar’ drawer of my mental filing cabinet, but obviously it’s not advisable to use a 4/4 strum rhythm during a song with a 3/4 time signature.

That was my first strumming problem, which I initially solved by just strumming downwards on each major beat. While this solution may indeed represent the simplest guitar strumming pattern, it is also the most mind-numbing and unmusical one.

The second problem I’ve encountered has been trying to strum one rhythm while singing another, which can feel a little like trying to simultaneously rub your belly and pat your head.

I wasn’t expecting this. Having played piano for many years, I never found it difficult to do one thing with my left hand and another with my right. But I guess doing one rhythmic thing with your hands and another with your voice is a horse of an altogether different colour. More like beginner drumming: trying to co-ordinate the right rhythm, limbs, and drum types. A truly non-trivial task.

Perhaps you’ve already taken the initiative and tried to solve the time signature/strumming/singing problem on your own, and encountered down-up strum diagrams which make you so obsessed with counting out the beats and strumming in the right direction that you don’t have any mental resources left to devote to chord changes or singing.

Maybe you, like me, feel that music should be more intuitive and enjoyable than that; that we should automatically know which strumming pattern and rhythm are most appropriate for any song. I think it’s possible that the answer to this is both yes (in the sense that a comfortable strum trumps one during which you constantly worry about direction and ‘correctness’) and no (in the sense that it’s only through dedicated and mindful practice that strumming patterns start to feel natural).

In effect, practice automates the rhythmic part of guitar, freeing up explicit mental focus for technique, chord changes, and/or singing.

Rhythmic strumming ‘muscle memory’ will develop faster with isolated strumming over-training: even when you think you’ve got it, keep going (to cement the neural circuits for that action). If you combine this with increased exposure to music employing all kinds of different rhythms (to develop a better general feel for musical rhythm), it should lead you towards relatively effortless strumming, even when combined with singing.

So go learn some pre-existing popular strumming patterns! Start with open strings (no chords). Don’t pause after each loop of the pattern: try to seamlessly integrate loop after loop so that your brain learns it without interruption from the start. When you feel comfortable, introduce a chord change each time the loop repeats.

What to practice, you ask? Here’s the best resource I’ve found for common 4/4 strumming patterns (incidentally, that single strumming pattern I was ‘inexplicably’ gravitating towards turned out to be the first one). For 3/4 strumming, try patterns 10-12 here. Beyond these patterns, I would recommend listening to some of your favourite songs and picking out the strumming pattern (including how it may change between the verse/bridge/chorus). Then copy those strumming patterns and try to play along.

The more you do this, the more you’ll get a feel for which strumming patterns:

(a) you like best, and
(b) fit best with different songs.

If you’re looking for a rhythmic challenge (and a cool song to play), try Ben Harper’s Another Lonely Day (but listen to the rhythm first!).

Ultimately, what you want to do with strumming is to create a consistent, fluid, and textured musical backdrop on which to unfold a song’s melody. You don’t want pauses where they don’t belong, or sudden changes in tempo/volume, because you don’t want the backdrop to feel fragmented (unless the piece is intended to sound that way). To borrow a lovely turn of phrase from guitardomination.net: “The fretting hand is the brain, but the strumming hand is the soul“.

You may think you are strumming and chord-changing smoothly, but I would highly recommend recording yourself and playing it back. You’ll be amazed at the things you hear on a recording that you don’t even notice while you’re concentrating on playing. For beginners struggling with smooth chord changes while strumming, there is apparently something called the ‘transition strum’ (although it does seem like a bit of a crutch, and not something you want to get used to!): instead of breaking the rhythm, just strum the open strings (softly) once, as you switch to the next chord. Keep in mind that this will usually sound fine between open chords (the open strings usually contain at least some of the notes in your chords), but that it usually won’t work so well between barre chords featuring no open strings.

A final round of tips that I’ve already mentioned in previous posts: fret as near the proximal fret bars as possible (to prevent buzzing), press down hard enough to properly shorten the strings (for a clear ring), and don’t accidentially mute strings adjacent to your fretting fingers (unless this is strategic, like muting the low E string during a B minor chord). You can also play around with some variations, to add some sonic spice to repeated chord progressions. For example, you could try modifying a regular chord (e.g. making it into a 7th or sus), or perhaps occasionally strumming only part of a chord (instead of the entire chord).

Many more rhythm guitar skills (beyond strumming) remain, but we’ll come to those another day.

Do you have any awesome tips for improving strumming? If so, I’d love to hear from you. Tweet at me (@acnotesblog), find me on Facebook (www.facebook.com/acnotesblog), or leave a comment below.

Happy playing!

P.S. Song of the day: Untouched by The Veronicas

If you like Untouched, please consider helping to support Acoustic Notes by checking out a The Veronicas’ album here.

RELATED POSTS

How to build a chord

Since we already know a bunch of chords, let’s take a little look under the hood.

Chords are made up of notes that sound good together. Because not all notes sound good together, there are rules governing how a chord is constructed. These rules are actually pretty simple, given that we already understand scales and intervals. From the 7 notes of a scale, using various intervals, you can build any chord.

As previously noted, the simplest form of a chord is a triad: a group of 3 notes stacked on top of each other in intervals of thirds (i.e. the 1st/tonic, 3rd/mediant, and 5th/dominant notes of any scale). There are many flavours of chords:

(1) Major Chords

Using notes from a major scale (1st + major 3rd + 5th) produces a major chord, which sounds bright and happy.

If we use C major (C, D, E, F, G, A, B, C) as our scale, the resulting major chord (Cmaj) is: C, E, G. You can confirm this by playing the Cmaj chord you already know and working out which notes are sounding (if you haven’t already done this).

(2) Minor Chords

Using notes from a minor scale (1st + minor 3rd + 5th) produces a minor chord, which sounds darker and sadder. The flattened 3rd is responsible for completely altering the emotional feel of a minor scale or chord.

If we use C minor, which has a flattened 3rd note (C, D, Eb, F, G, A, B, C) as our scale, the resulting minor chord (Cmin) is: C, Eb, G. You can confirm this in the same way as above.

(3) 7th Chords

major 7th: major chord + major 7th (sounds dreamy and thoughtful). E.g. Cmaj7: C, E, G, B.

dominant 7th: major chord + minor 7th (sounds powerful and adventurous). E.g. C7: C, E, G, Bb (i.e. just like Cmaj7, but with a flattened 7th note).

minor 7th: minor chord + minor 7th (sounds moody and contemplative). E.g. Cmin7: C, Eb, G, Bb (i.e. just like Cmaj7, but with flattened 3rd and 7th notes).

(4) Suspended Chords

Here the 3rd note is replaced with the 4th (sus4) or major 2nd (sus2) note of the scale.

Because the 3rd is not there (it has been ‘suspended’), these chords are neither major nor minor in character (‘power chords’ also skip the 3rd note so they can be used in both major and minor contexts).

A sus4 chord evokes a feeling of needing to resolve to the unsuspended chord (the 4th ‘pulls’ to be resolved onto the 3rd). A sus2 chord does not produce as strong a resolving pull.

Csus4: 1st + 4th + 5th = C, F, G.

Csus2: 1st + major 2nd + 5th = C, D, G.

(5) Slash/Split Chords

In these chords, the lowest note is not the 1st note of the scale.

For example, A/G refers to the Amaj chord, but with G (instead of A) as the lowest note.

(6) Added Tone Chords

These are regular major or minor chords, but (unsurprisingly) with added notes above them.

For example, Cadd9 is a Cmaj triad (C, E, G) + 9th (D).

Notice that a sus2 chord is equivalent to an add9 chord without its 3rd note.

You can confirm the construction of any of the chords discussed above by playing them and working out which notes they contain.

That’s it for today!

While there are many more flavours of chords – including 6ths, 9ths, diminished, and augmented – I don’t want to overwhelm you with information, so we’ll consider these in more detail in a future post. However, if you want to go deeper into major and minor chord construction (as well as getting a little taste of what augmented and diminished chords are), you can watch below how chord construction principles are illustrated on a piano keyboard. It’s not the most exciting video, but it does provide a clear explanation:

In the next chord post, we’ll take a look at playing some suspended chords, and a few songs in which they feature.

Until then, happy playing!

P.S. Song of the day: The Only Boy Awake by Meadows

If you like The Only Boy Awake, please consider helping to support Acoustic Notes by getting it here.


RELATED POSTS

chords 1: A, E, and D major

chords 2: Am, C, G, Em

chords 3: Dm, partial F, B7

7th chords

more 7th chords

even more 7th chords

barre chords

Scales: digging a little deeper

While this post may not have immediate practical impact on your playing, it will help you to:

– understand chord naming conventions
– develop your ear
– better understand the music you listen to, play, and write
– improvise within different music genres.

All these things automatically – albeit indirectly – contribute to improving playing over time.

Remember the notes in a scale? Each note (‘degree’) in a seven-note scale is named for its function in a piece of music. We’ll use the C major scale as our example here:

1st – root/tonic (C)
2nd – supertonic (D)
3rd – mediant (E)
4th – subdominant (F)
5th – dominant (G)
6th – submediant (A)
7th – leading (B)

There’s no need to memorise these names yet; just be aware that they exist. We’ll come back to them in future posts about writing your own music.

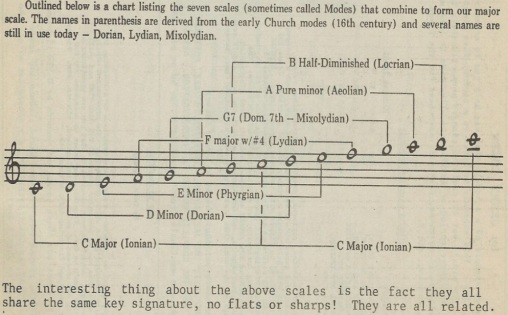
From any ‘parent’ scale (again, we’ll use C major as the example), we can derive additional ‘modes’ (unique scale types) by playing:

  • starting on C (C, D, E, F, G, A, B, C) to produce the C Ionian mode (regular Cmaj)
  • starting on D (D, E, F, G, A, B, C, D) to produce the D Dorian mode
  • starting on E (E, F, G, A, B, C, D, E) to produce the E Phrygian mode
  • starting on F (F, G, A, B, C, D, E, F) to produce the F Lydian mode
  • starting on G (G, A, B, C, D, E, F, G) to produce the G Mixolydian mode
  • starting on A (A, B, C, D, E, F, G, A) to produces the A Aeolian mode (regular Amin)
  • starting on B (B, C, D, E, F, G, A, B) to produce the B Locrian mode

scalemodes

Image credit: http://www.colorado.edu (please excuse Phrygian spelling error)

Again, there’s no need to memorise these names yet, but the memory aid “I Don’t Practice Lousy Modes A Lot” might help if you are so enclined.

Although all of these scale modes employ the same set of notes, they each start on a different degree of the scale, producing a different interval pattern in each mode. This is what gives each mode its distinct sonic character. Some sound major, some sound minor, some sound ambiguous, and each has its own *feel*.

The familiar Ionian and Aeolian mode (regular major and minor) scales are obviously used liberally in contemporary Western music.

Dorian mode scales can sound sophisticated or Medieval/Celtic, and are sometimes used in jazz. Dorian mode song examples: Eleanor Rigby by The Beatles, Scarborough Fair by Simon and Garfunkel, Billie Jean by Michael Jackson, and Smoke on the Water by Deep Purple.

Phrygian mode scales have a desperado/cowboy or exotic/Spanish feel, and are used, for example, in Flamenco music. Phrygian mode song examples: Liszt’s Hungarian Rhapsody No. 2, and the final aria of Philip Glass’s Satyagraha.

Lydian mode scales sound especially light, goofy, and happy, and can replace the regular major scale, often also being used in jazz. Lydian mode song example: The Simpsons Theme Song.

Mixolydian mode scales are common in funk, jazz, blues, and bluegrass/Southern Rock music. Mixolydian mode song examples: Norwegian Wood and Tomorrow Never Knows by The Beatles.

Locrian mode scales are not commonly used, except maybe in Death Metal. They can sound grand and opulent, or very unsettling. Locrian mode song examples: Deliverance by Opeth, Wherever I May Roam by Metallica, and Rachmaninov’s Prelude in B minor, Op. 32, No. 10.

Happy playing!

Song of the day: Baby Can I Hold You by Tracy Chapman

If you like Baby Can I Hold You, please consider helping to support Acoustic Notes by getting it here.

RELATED POSTS

major scales

minor scales

applying scales: understanding the fretboard

pentatonic scales

playing major and minor scales

the purpose of sheet music

the basics of reading sheet music

reading sheet music for guitar

Reading sheet music: application to guitar

Reading sheet music – just like reading a book aloud – consists of translating written notation into played music.

Unfortunately the guitar isn’t the most intuitive instrument for learning to read music, particularly if you don’t already have experience with a linear keyboard instrument. On the guitar, pitch varies in two perpendicular directions (up and down the fretboard, as well as up and down the strings), the same note can be played in multiple places, and it’s not always obvious which fingers to use. Because of this, guitar players are often poorer at sight-reading than other instrumentalists.

However, although reading music may be challenging at first, approaching it methodically will have you successfully sight reading in no time. Here is the step-by-step method I follow:

(1) Before You Begin Understand the basic theory we’ve already covered: strings/frets/notes, applying tones and scales, time signatures, note positions on the staff, and that some notes in certain scales must be sharpened/flattened.

(2) Choose a Piece Choose the appropriate level of beginner sheet music for guitar. You want something you are able to accomplish with some – but not too much – effort, so you don’t get discouraged and give up.

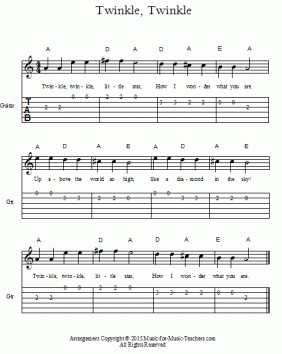
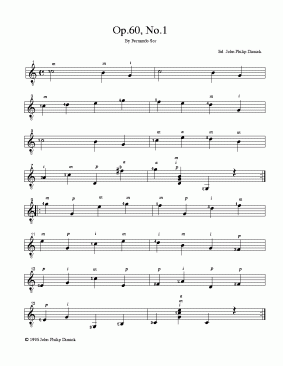
If you are an absolute beginner in terms of reading sheet music, I recommend starting with something like Twinkle Twinkle Little Star (see below). This may seem lame, but I’ll tell you why it’s a good idea: there are no sharps or flats, it’s in 4/4 time with a simple rhythm, and – crucially – you already know what it sounds like, so you can tell if you’re getting it right. Instant feedback. Instant gratification. Once you’re satisfied that you can interpret and play that, you could try something slightly more challenging, like Sor’s Opus 60, no. 1 (see below), which has a single sharp.

twinklestarsheetmusic   sorop60no1sheetmusic

Because I’m already able to read sheet music, I started with a simple arrangement of Carulli’s Andantino (see below), which has a slightly more complex rhythm, an additional sharp, and notes which are played simultaneously. If you’re not sure if you’re playing something correctly, try to find an online recording of it, or a YouTube video of another guitarist playing the same piece.

carulliandantinosheetmusic

(4) Name the Notes Identify the first note of the piece: where is the note on the staff? What is that note’s name? Check the key signature at the beginning of the piece to see if that note is one that should be sharpened or flattened (memorise which note/s, if any, must be sharpened/flattened).

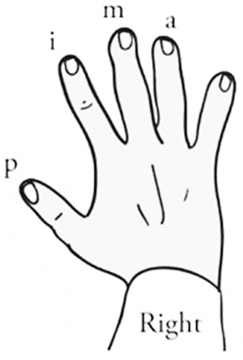
(5) Play the Notes Locate the first note on the guitar: which string and fret should you play it on? Should it be played by the thumb on the bass strings (stem downwards), or the other fingers on the treble strings (stem upwards)? Guitar music often has some notation to help you with this: numbers next to the note may indicate which string to use, and letters (p, i, m, a) may indicate which finger to pluck with (‘c’ would indicate the little finger).

righthandpima

However, you will usually have to decipher on your own which fret will produce the desired note, and which fingers to use when fretting. Making these kinds of decisions can be especially difficult for beginners. Here are some tips:

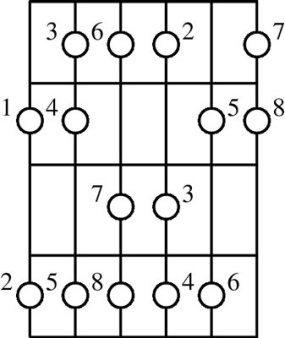
  • to find the note on the strings/fretboard, use the scales you already know or refer to the following diagram of the 1st and 5th position notes (i.e. to play a piece nearer the headstock from open strings onwards, or from the 5th fret onwards, respectively)


sightreadfirstfifthpositionnotes

  • notes in the 1st/5th fret are fretted with the index finger, notes in the 2nd/6th fret with the middle finger, notes in the 3rd/7th fret with the ring finger, and notes in the 4th/8th fret with the little finger
  • for the strumming hand: two treble notes played directly after each other should never be played with the same finger (i.e. alternate your treble fingers, even when playing the same note twice or more in succession).

(5) Play In Rhythm Identify the time signature and count or tap out the rhythm slowly, then try to play the notes in the correct rhythm. Depending on how comfortable you are with rhythm, you may start playing the piece in the correct rhythm earlier on (i.e. before you get to step 5), especially if you’ve heard it before and know what it should sound like.

That’s it: all the important first steps you need to read sheet music for guitar. Initially you’ll literally be interpreting a single note at a time, similarly to sounding out invidual letters when first learning to read books. But, as long as your practice is intentional (rather than mindless), you will automatically develop muscle memory for where to find each note on the guitar. Additionally, over time, you will start being able to digest chunks of the sheet music and to read ahead, the same way you do when reading books.

I try to unravel and memorise a piece one bar at a time (plus the first note of the next bar, to prevent pausing between bars). In practical terms, this means I find the notes on the strings/fretboard, decide on fingering, and play the sequence of notes through a couple of times each day. It’s really important to write the appropriate fingering, strings/frets, and any other useful notes onto the sheet music to remind yourself what works best.

A natural side effect of trying to understand the music in this way is that you end up memorising it. This is helpful in the sense that it’s much more enjoyable to play and interpret a memorised piece, but it’s equally important to keep practicing your actual sheet music reading skills as the piece becomes memorised. This can be achieved by continuing to figure out the next part of the piece, and/or by trying to sight-read some simple passages (pdf) appropriate to your level of expertise.

Once you have memorised the entire piece, it’s probably time to add a metronome to produce the correct tempo (noted on the sheet music):

tempoguidelinechart

… and to start interpreting the other instructions on the piece (e.g. changes in volume, pace, or texture), which we’ll discuss in more detail in a future post.

Let me know if this series of posts has been useful, or if there’s something I left out. Tweet at me (@acnotesblog), find me on Facebook, or leave a comment below. If you’re finding Acoustic Notes helpful, please tell a friend who you think would benefit!

Happy playing!

P.S. Song of the day: What We Had by Sulene

If you like What We Had, please consider helping to support Acoustic Notes by getting it here.


RELATED POSTS

the purpose of sheet music

the basics of reading music

Playing Major and Minor Scales

Notes are the alphabet of music, and scales help you learn that alphabet by heart so that you can speak the language fluently. This comes much more easily on a piano keyboard: early on you can tell at a glance which key will produce which note, because everything is layed out linearly. On a guitar fretboard, however, it only comes with practice.

How it feels to play particular notes, and to move from one note to the next, will eventually stick in your brain so that the target note and the action required to produce that note become one and the same. It may seem a long way off, but, eventually, instead of having to think through where a note is, or how to get from one note to another, you’ll just know, and that will help you to improvise, sight-read sheet music, and compose your own music.

If you do a Google search for how to play scales on a guitar, you’ll often come across something called the CAGED system. For various reasons, this is not the system I’m using.

So far, the simplest system I’ve found – and one which is helping me get to know the fretboard – is something called the ‘notes-per-string’ system.

Using this system, you can play any major or minor scale on the guitar (the note you start on is the scale you will play). I find it helps me learn the fretboard if I focus on one scale at a time, and think each note name as I play that note. This is easiest in the scales of C major and A minor, which have no sharps or flats. Here we go!

(1) Major Scales

universalmajorscalepattern

Image credit: http://www.dummies.com

This follows the tone pattern described in the major chord theory post. You can start on any fret, and the numbers represent in which order the notes should be played. Your fingers go:

low E string middle finger plays 1st note, little finger plays 2nd note

A string index finger plays 3rd note, second finger plays 4th note, little finger plays 5th note

D string index finger plays 6th note, ring finger plays 7th note, little finger plays 8th note (which also acts as the 1st note of the next octave)

G string index finger plays 2nd note (of next octave), ring finger plays 3rd note, little finger plays 4th note

B string middle finger plays 5th note, little finger plays 6th note

high E string index finger plays 7th note, middle finger plays 8th note

Play this all the way (two octaves) up, and then reverse it to go all the way back down. Be sure to keep your fretting hand in the correct position to enable you to play all the notes easily, with economical movement.

(2) Minor Scales

universalminorscalepattern

Image credit: http://www.dummies.com

This follows the tone pattern described in the minor chord theory post. You can start on any fret, and the numbers represent the 1st note of the first octave, and the 1st note of the second octave. Your fingers go:

low E string index finger plays 1st note, ring finger plays 2nd note, little finger plays 3rd note

A string index finger plays 4th note, ring finger plays 5th note, little finger plays 6th note

D string index finger plays 7th note, ring finger plays 8th note (1st note of next octave)

G string index finger plays 2nd note (of next octave), middle finger plays 3rd note, little finger plays 4th note

B string index finger plays 5th note, middle finger plays 6th note, little finger plays 7th note

high E string index or middle finger plays 8th note

Play this all the way (two octaves) up, and then reverse it to go all the way back down. Be sure to keep your fretting hand in the correct position to enable you to play all the notes easily, with economical movement. You can see in the next image how this minor scale relates to a scale we already know: the minor pentatonic (coloured positions).

universalminorscalepattern

Understanding Minor Scales

You can see here that the first difference between the major and minor scales is the third note, which has been flattened by a semitone in the minor scale. Amazingly, it’s this flattened third note that gives the minor scale its melancholy feeling.

What you’ve just learned to play is the ‘natural’ minor scale. From it, you can derive the ‘harmonic’ minor scale, in which the seventh note of the scale is raised by a semitone (move the 7th position on the diagram above up a semitone in each octave – this will mean you will play the 7th note of the final octave on the high E string instead of on the B string).

The purpose of the harmonic minor is to create musical tension that wants to resolve the 7th note onto the next note (the ‘home’ note of the scale). The harmonic minor is used more often than the natural minor in popular (Western) styles of song-writing; we’ll get into this in more detail in a future post.

There is another form of the minor scale, called the ‘melodic’ minor, in which the 6th and 7th degrees of the scale are each raised by a semitone going up, but then played naturally again coming down. If you play the piano, you will probably be most familiar with melodic (rather than natural or harmonic) minor scales.

To understand the different minor scale forms better, you may find this video useful:

That’s it! Now you can play any major, minor, or pentatonic scale. Do you have any helpful hints/tips for playing scales on the guitar? Tweet at me (@acnotesblog), find me on Facebook, or leave a comment below.

Happy playing!

P.S. Song of the day: We Are Young by Fun (ft. Janelle Monae)

If you like We Are Young, please consider helping to support Acoustic Notes by getting it here.

RELATED POSTS

strings, frets, & notes

tones & major scales

minor scales

understanding the fretboard

understanding the pentatonic scale

playing the minor pentatonic

Barre Chords

I think it’s finally time for some barre chords. Ready?

Here’s the secret: just three fretting shapes can play any basic major or minor barre chord you can think of.

We can learn them using the following five barre chords:

B minor/C minor

bmbarre cmbarre

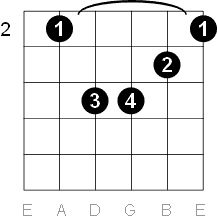
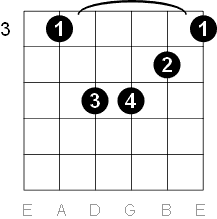
For Bm, your fingers go: ring finger on the D string, 4th fret; little finger on the G string, 4th fret; middle finger on the B string, 3rd fret; and index finger barring across the high E and A strings, 2nd fret. Make sure you’ve got the right part of your finger on the high E to be able to press it onto the fretboard firmly enough. Don’t play the low E string.

For C-minor, move that whole shape up in pitch one fret so that the barring finger is on the 3rd fret. You can actually move this shape to any fret, and it will work to play the corresponding minor chord.

F minor/G minor

fmbarre gmbarre

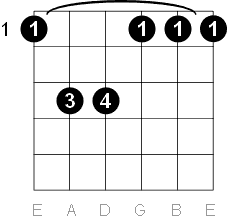
For Fm, your fingers go: ring finger on the A string, 3rd fret; little finger on the D string, 3rd fret; index finger barring across all the other strings, 1st fret. Rotate your index finger so that you’re barring with the bony part (nearer the thumb) rather than the fleshy part. Play all the strings.

For Gm, move that whole shape up in pitch two frets so that the barring finger is on the 3rd fret. Again, you can move this shape to any fret, and it will work to play the corresponding minor chord.

Notice how it’s very similar to the shape for the Bm/Cm barre chord, just with the ring and little fingers one string position up, and no middle fretting position.

F#/Gb major

fmajbarre

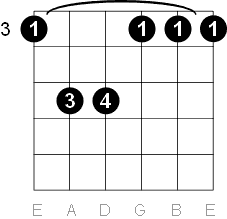
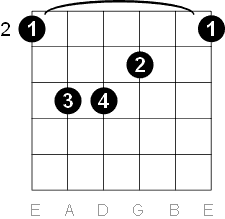
For this, you basically just add a middle fretting position to the Fm/Gm shape. Your fingers go: ring finger on the A string, 4th fret; little finger on the D string, 4th fret; middle finger on the G string, 3rd fret; index finger barring across all the other strings, 2nd fret. Play all the strings. Again, you can move this shape to any fret, and it will work to play the corresponding major chord.

That’s it! Those are the three shapes. Obviously, depending on the chord progression, you may want to learn some other shapes to help achieve maximal economy of movement, but as a beginner you really can’t do better than knowing those three barre chord shapes.

As I mentioned previously, changing tack from playing open to playing barre chords can be tricky in the beginning. After two weeks, my hands are no longer cramping when I play barre chords. It seems like that’s just a natural consequence of regular practice.

Now my biggest challenge is making sure to place my fingers accurately and firmly enough to prevent muting of adjacent strings and string buzzing. What’s working to correct this for me is placing individual fingers in the order described for each chord above. That way, you can make sure each finger is firm and not interfering with adjacent strings before you place the barring finger. That finger should be straight, and as close to the fret bar as possible. You’ll be using your thumb on the back of the neck to help generate the force you need for your barring finger.

Once you’ve made the barre chord shape, it’s a good idea to play each string (note) in the chord individually, so you can get a feel for how your fingers need to be positioned for each note to ring out clearly.

For the Bm/Cm chords, you may actually want to mute the low E string with the tip of your barring finger, to avoid sounding it accidentally.

What’s going to keep you motivated over the barre chord hurdle? For me it was just finding songs I love that use those chords, and then playing them until the barre chords start to feel *almost* as easy as the open chords.

If you can find a song where the change from an open chord to a barre chord also has an anchor string/finger that you can keep the same when switching between the chords, that’ll really help to keep your hand in the right position during the change. If you want to know all my secrets, my Bm practice song is Mazzy Star’s Fade Into You, and my (most recent) F# practice song is Fields of Gold.

But I would advise finding some songs that really excite you, and let that carry you through the tough parts of learning to play barre chords.

Have any good tips for barre chord noobs? Tweet at me (@acnotesblog), find me on Facebook, or leave a comment below.

Happy playing!

P.S. Song of the day: Things That Keep Me Up At Night by Brolly

RELATED POSTS

jumping the first hurdle

understanding the fretboard

Basic fingerstyle patterns

As you saw previously, fingerstyle really just consists of plucking the strings, usually individually and in a particular order.

This produces a more folk-y, arpeggiated sound than strumming.

Today we’ll look at some of the (simplest) fingerstyle patterns I skipped in the last fingerstyle post. ‘Pattern’ just refers to the order and timing in which the strings (notes) are played.

One more guideline before we start: the little finger can be used to stabilise your picking hand against the guitar, if you’re able to reach. This is supposed to help keep the right fingers poised over the right strings, so you don’t drift off course. I find that this makes my hand a little stiff, and makes plucking the strings feel less natural, so I just let my hand float. Since your right arm is already stabilised against the guitar, your hand will stop drifting with a little practise. It’s really up to you; choose whatever feels right. Ok, here we go:

(1) Simplest fingerstyle pattern (open strings)

Image credit: http://www.spinditty.com

play low E with your thumb
play G with your index finger
play B with your middle finger
play high E with your ring finger
play B (middle finger) again
play G (index finger) again

Repeat this pattern until you are comfortable and can do it smoothly, without looking.

(2) Simplest fingerstyle pattern (chords)

Make your favourite chord shape with your fretting hand, and use the simple fingerstyle pattern to play the notes of the chord, starting on the lowest note of the chord.

But! Remember that in some chords the low E string isn’t played, in which case the lowest note of the chord will be played on the A string. Similarly, if the A string isn’t played, the lowest note of the chord will be played on the D string. If you’re unsure, look back at the chord diagrams (AED, AmCGEm, DmFB7, etc.).

Once you’ve got that down, choose a three-chord progression that you like, and play through it, fingerstyle.

(3) Alternating-bassline fingerstyle pattern

This is the next one I learned, where you play the lowest-pitched two notes of the chord with your thumb, and the next two notes of the chord with your index and middle finger. The pattern goes like this:

lowest note of chord – thumb
third note of chord – index finger
second note of chord – thumb
fourth note of chord – middle finger

So it feels kind of like a rocking chair: thumb down, index finger up, thumb down, middle finger up. A tip from the awesome folks at Original Fuzz: if you make sure to keep that alternating bassline (thumb) steady, everything else will fall into place. You can even practise just playing the alternating first and second notes of the chord with your thumb, and then add in the index and middle fingers on the beats in-between.

Once you get this down, try it with your three-chord progression.

(4) Fingerstyle pattern for 4/4 time

4 beat fingerstyle pattern
Image credit: http://www.spinditty.com

Although it looks different, this is actually very similar to the previous style: there’s still an alternating bassline; just with more notes in-between. You’re also introduced here to plucking two strings at the same time, which sounds kind of bluegrass-y.

The playing pattern goes:

lowest note of chord – thumb
third note of chord – index finger
simultaneous fourth and fifth notes of chord – middle and ring fingers
third note of chord – index finger
second note of chord – thumb
third (index) again
simultaneous fourth and fifth (middle and ring) again
third (index) again
repeat

Try it with your three-chord progression.

(5) Fingerstyle pattern for 3/4 time

3 beat fingerstyle guitar pattern
Image credit: http://www.spinditty.com

Again, very similar to the previous playing pattern:

lowest note of chord – thumb
third note of chord – index finger
fourth and fifth notes of chord – middle and ring fingers
third (index) again
fourth and fifth (middle and ring) again
third (index) again
repeat

Try it with your three-chord progression.

That’s it for today. These basic fingerstyle patterns should set you up for most of the songs you want to play, although I’m sure there will be future posts covering more complex patterns as well.

What are your favourite fingerstyle patterns? I’d love to hear. Tweet at me (@acnotesblog), find me on Facebook, or leave a comment below.

For now, happy playing!

P.S. Song of the day: What We Wanted by Dear Reader

https://bandcamp.com/EmbeddedPlayer/album=3177762606/size=large/bgcol=ffffff/linkcol=0687f5/minimal=true/track=1047850735/transparent=true/

(if the embedded player doesn’t render properly in your browser, just open the link in a new window)

If you like Dear Reader, please consider helping to support Acoustic Notes by getting their album here.

RELATED POSTS
finger-picking

Intervals: preparing to understand chords

We’ve learned quite a few chords by now, and you may be wondering exactly what a chord is. Let’s prepare to take a look under the hood (in the next tutorial post).

Most simply, a chord is a group of three (or more) notes of a scale, played simultaneously.

You could really play any notes in a scale simultaneously, but it won’t always sound pleasantly musical (‘consonant’). Sometimes it will sound unpleasantly noisy (‘dissonant’). Both consonance and dissonance can be very useful (e.g. in romantic comedies versus horror movies). Listen to examples of both consonance and dissonance here:

Although there is still some disagreement as to the underlying reasons and mechanisms, humans may have an innate biological preference for consonance over dissonance. The brain of a human newborn can distinguish between consonance and dissonance as early as one day post-partum, and – at least by two-months of age – infants prefer consonant to dissonant music. Additional species (e.g. macaques, and songbirds such as sparrows and starlings) are also able to distinguish consonance from dissonance, although preference is unclear.

Others argue that the consonance/dissonance preference is a product of culture and degree of exposure to consonant music. However, three day-old chickens incubated, hatched, and raised in a controlled, soundproof environment still prefer to spend time near speakers producing consonant, rather than dissonant, music. Even humans with a condition called amusia – the inherited inability to distinguish pitch, sing in tune, recognize melody, and distinguish consonance from dissonance – prefer consonance.

We’ll discuss the physics underlying the phenomena of consonance and dissonance in a future post, but, for now, let’s consider how they come about from a musical perspective.

The pitch distance between any two notes in a scale is called an ‘interval’. There are multiple interval possibilities:

unison – no distance (the same note of the scale, played twice)
second – distance from the 1st to the 2nd note of the scale
third – distance from the 1st to the 3rd note of the scale
fourth – distance from the 1st to the 4th note of the scale
and so on (even beyond an octave).

When using notes from the major scale, you end up with major intervals. For example, a major second contains a whole tone distance, a major third contains two whole tones, and so on.

When using notes from the minor scale, you end up with minor intervals. For example, a minor second contains only a semitone distance, a minor third contains only three semitones, and so on.

Notice that the unison, 4th, 5th, and octave interval distances (0, 5, 7, and 12 semitones, respectively) are always the same, whether you use a major or a minor scale to build them. For this and other (more complicated) reasons, these intervals are referred to as ‘perfect’.

Apart from having a major or a minor quality, interval identity can be altered to produce additional forms:

  • augmented, in which the higher-pitched note is one semitone higher than expected (its pitch has been sharpened)
  • diminished, in which the higher-pitched note is one semitone lower than expected (its pitch has been flattened).

Each specific type of interval evokes a very distinctive feel. You can listen here:

If you’d like to test your ability to identify intervals, here’s a handy online tool.

That’s it for today. In the next tutorial post, we’ll use this knowledge of intervals to understand how chords are built.

Until then, happy playing!

P.S. Song of the day: Call It Off by Tegan and Sara

If you like Call It Off, please consider helping to support Acoustic Notes by getting it here.

RELATED POSTS
tones and major scales

minor scales

Bonus post: playing the minor pentatonic scale

Today we’re going to learn the A minor pentatonic scale, which consists of the notes A C D E and G (no sharps or flats).

Before we get to the fingering positions, remember that scales must be practiced slowly and intentionally from the very beginning. You want to get them 100% right from the start to prevent picking up bad habits. So don’t rush. Start slow, build up slow.

Ok, let’s walk through the fingering for the first position (or form) of Am pentatonic (starting on the 5th fret of the low E string):

aminorpentatonic

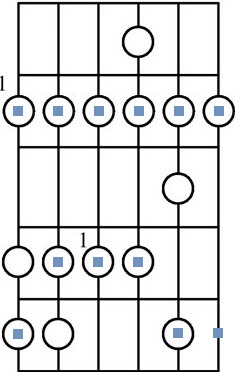
The index finger does all 5th fret fretting, the middle finger does all 7th fret fretting, and the little finger does all 8th fret fretting. Hopefully your little finger doesn’t have the same tendency to either totally curl up (maybe to get out of the way of the other fingers?) like mine, or spaz out and straighten when I try to press down.

The order in which you play the finger positions goes:

  • low E string index finger position, then little finger position
  • A string index finger position, then middle finger position
  • D string same positions as for A string
  • G string same positions as for A string
  • B string same positions as for low E string
  • high E string same positions as for low E string

Now reverse the whole thing. That’s it! You’ve played a scale. Mazel tov.

Since we already learned where all the notes are on the fretboard, it may be obvious to you that applying this same shape will enable you to play any minor pentatonic scale (i.e. in any key) by just changing the fret on which you start. The same position moved one fret up (pitch-wise) plays the next key’s scale.

In addition, this same position can also be applied starting on an open E string (i.e. key of E minor), in which case you just play open strings instead of the 1st finger positions, so it’s even easier. Try it out. In the key of Em, the five notes of the scale are: E G A B D (no sharps or flats).

Now go practice. Until your roommates duct-tape your hands in your sleep to get you to stop practicing. Hopefully at that point you’ll be playing a pretty good pentatonic scale. And you’ll be ready to use it to improvise a guitar solo (it’s true). Here’s a slow rock-blues backing track in A minor to get you started.

Using a universally-tuned guitar, play your Am pentatonic scale over the backing track in time to the beat. Sounds pretty good, right? But you’re impatient. How do you get from there to improvisation, I hear you asking. Ok, here are the steps. Play the scale over the backing track again:

(1) first in time to the beat, then at half-speed, then at double-speed

(2) in a different rhythm, maybe with a pause after the first note, then after every third note

(3) with some notes skipped out

(4) with some notes repeated

(5) including some (right-sounding) notes from outside Am pentatonic (e.g. from just below or above your fret positions)

Now put all of that together in a way that sounds good to you, and you’re jamming. Feels good, right? Keep going. Find some other backing tracks you like, maybe in different keys, and see what you can do.

Let me know how it’s going! Tweet at me (@acnotesblog), find me on Facebook, or leave a comment below. In the next theory tutorial, we’ll use scales to understand how chords are built.

Until then: happy playing!

P.S. Bonus song of the day: Pour Some Sugar on Me by Def Leppard

If you like Pour Some Sugar on Me, consider helping to support Acoustic Notes by getting it here.

RELATED POSTS

strings, frets, and notes

tuning the guitar

tones and major scales

minor scales

pentatonic scale theory

Understanding the Pentatonic Scale

As you can probably surmise, ‘penta-‘ means ‘five’.

The major and minor pentatonic scales each consist of five of the seven notes making up the major or minor scales, respectively. These five notes are:

  • the 1st, 2nd, 3rd, 5th, and 6th notes of the major scale (the 4th and 7th notes are left out, removing all semitones from the scale)
  • the 1st, 3rd, 4th, 5th, and 7th notes of the minor scale (the 2nd and 6th notes are left out).

If you play only the black notes on a piano keyboard, starting on Gb/F#, they form the pentatonic scale of Gb/F# major. When (Western) kids try playing only the black notes on the piano for the first time, they are almost always excited to have found a way to mimic Oriental-sounding music. Listen here (towards the end of the video she plays without talking over it):

Pentatonic scales are very easy to learn on the guitar. In addition, humans apparently have an innate grasp of how to vocally produce pentatonic scales, and how they sound. It’s unsurprising, then, that this scale is very common in early folk melodies. Here’s a great video – if you haven’t already seen it – demonstrating this innate human understanding of the pentatonic scale:

The pentatonic scale actually forms the basis of many styles of music, from Oriental to blues to jazz, and even rock (and beyond). It’s also essential for the improvisation of guitar solos.

In the next post, we’ll learn how to play a minor pentatonic scale in the 1st position (of 5 overlapping positions). Examples of well-known songs employing the pentatonic scale include: Auld Lang Syne (happy 2017!), Amazing Grace, Swing Low Sweet Chariot, Cotton-Eyed Joe, and AC/DC’s Shook Me All Night Long (which, incidentally, is also today’s song of the day).

Happy playing!

If you like Shook Me All Night Long, please consider helping to support Acoustic Notes by getting it here.

RELATED POSTS
strings, frets, and notes

the major scale

the minor scale

applying tones and scales: understanding the fretboard