Basic rhythm: preparation for strumming

Imagine the practice scene in every dance movie you’ve ever seen.

The instructor always counts out “5-6-7-8!” before everyone launches into the dance, right? The instructor is ‘counting the dancers in’ so that everyone starts dancing at the same time, with the same timing.

Just like dancing, music behaves in a particular way in time: every song has a particular rhythm. Music is all about rhythm.

Because most people have a natural sense and understanding of rhythm, they can easily dance and sing without having to be taught the music theory underlying rhythm. It’s even relatively easy to play music you’ve heard before on an instrument, without necessarily needing to consult the theory.

But to play sheet music you’ve never heard before, to write sheet music, and to choose the correct strumming pattern for a song, you need to understand the concept of the ‘time signature’. Maybe you’ve tried strumming the chords to the songs you’ve been practicing, and have noticed that you can’t quite make the strumming pattern match up to the timing of the singing. If so, you are in good company. Also: this post is for you.

Musicians write down music – and its timing – on a staff (divided into compartments called ‘bars’ or ‘measures’). Each bar contains a certain number of beats. The number of beats per bar is called ‘meter’. Meter is indicated on sheet music using a time signature: two numbers stacked on top of each other at the beginning of a piece:

stafftimebars

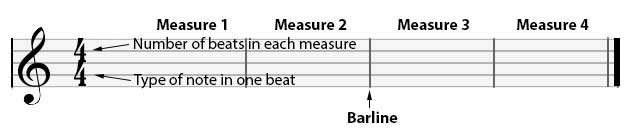
Image credit: http://strumspot.com

There a few possibilities for how (relatively) long each beat can be. Musicians use specific note symbols to represent the relative length of each note’s beat:

musicnotehierarchy

The actual length of each beat depends on something called ‘tempo’: how fast or slow the music is being played. If we set a metronome slow, to sixty beats per minute, each crotchet would last 1 second. In practice, the tempo of music pieces is usually faster than this.

For example, popmusictheory.com figured out that the most common tempo of 2015’s top 100 songs was 120 bpm. And, depending on how fast you like to work out (especially running), you can use a chart to find the ideal song tempo and create the perfect workout playlist (you can find the tempo of any song here).

But let’s get back to the theory. The most common time signature is 4 crotchets per bar: each bar contains 4 beats, and each beat is a quarter note long. In time signature notation, this is written as 4 over 4 (or as ‘c’ for ‘common time’). The bottom number tells you which type of note (‘4’ indicates ‘quarter’-notes a.k.a. crotchets), while the top number tells you how many of these notes per bar (before you start over again in a new bar).

Typically, the first beat of every bar is accentuated (in the same way that some words in a sentence are emphasised), so you would count out the meter as “1-2-3-4, 1-2-3-4, 1-2-3-4″ etc.

Let’s apply this to something simple, like Twinkle Twinkle Little Star:

twinklestartiming

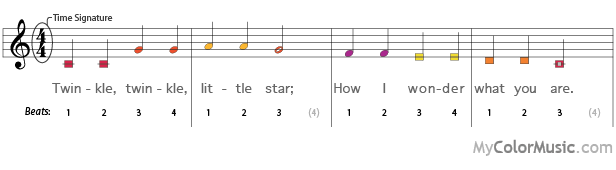
Image credit: http://www.mycolormusic.com

As you can see, in 4/4 time every beat in a bar doesn’t have to be a quarter note (or even any note – there can just be silence during some beats), but together the beats in a bar must add up exactly to the time signature. For instance, in Twinkle Twinkle, the first and third bars contain 4 crotchets each, the second and fourth bars contain 2 crotchets and 1 minim each. Remember that 1 minim beat is equivalent in length to 2 crotchet beats, so each bar still adds up to four crotchet beats.

What emerges from exactly how the beat lengths and accents (and silences) are arranged is the overall rhythm of the music. Different rhythms can make music feel completely different, for example ‘swing’ versus the Latin rhythms (e.g. cha-cha).

Now try counting out “1-2-3-4” to something a little more complex,  the Beach Boys’ Surfin’ USA:

Other common time signatures apart from 4/4:

  • 3/4 indicates three crotchets per bar, also known as a ‘waltz’. Count out “1-2-3, 1-2-3” etc. Try it with Kelly Clarkson’s Breakaway:

  • 2/2 (also sometimes written as ‘c’, but with a vertical line through the c to indicate ‘cut-time’) indicates two minims per bar, also known as a ‘march’. Although there are the same number of beats per bar as in 4/4 time, 2/2 time *feels* different. Count out “1-2, 1-2” etc. (like the “left-right, left-right” of a march). Try it with this piece (commonly referred to as the ‘Graduation March’; actually Edward Elgar’s ‘Pomp and Circumstance March No. 1 in Dmaj, Op. 39’):

There are many more possible time signatures (e.g. 6/8 or 5/4), some of which are more complex or unusual. For now it’s enough just to understand 4/4 and 3/4 in preparation for the next tutorial post: strumming patterns.

Happy playing!

P.S. Song of the day: Brown Eyed Girl by Van Morrison

If you like Brown Eyed Girl, please consider helping to support Acoustic Notes by getting it here.

RELATED POSTS

chords #1

chords #2

chords #3

chords: 7ths

chords: more 7ths

chords: even more 7ths

Applying tones & scales: understanding the fretboard

Today: instant proof that tone and scale theory have useful practical applications.

This post builds on two previous tutorials (tones and major scales, minor scales), so if you haven’t read/understood those yet it makes sense to go back and do that first.

Using Tones to Understand the Fretboard

Remember: a whole tone is twice the pitch distance of a semitone.

How do we apply this knowledge to the guitar?

Well, every fret you shorten a string by increases pitch by a semitone. It follows that you can work out where any note (on any string) is located on the fretboard. The only other thing you have to remember is that there is only a semitone’s difference between E and F, and between B and C (just like on the piano).

Remember the Jaws theme (alternating E and F)? Fretting the low E string in the 1st fret produces an F. Fretting it in the very next fret produces and F#. The next fret produces a G, then a G#, then: A, A#, B, C, C#, D, D#, E, F, etc. If you took the time to work it all out, the fretboard note positions would look like this:

labelledfretboard

Image credit: http://www.dummies.com

As we’ve discussed before (and as you can see from the diagram), you can play the exact same note (pitch) at multiple places on the fretboard. Remember, too, that all notes with the same name sound similar, even if they are octaves apart.

Test your understanding: how many octaves are there between the open low E string and the open high E string? Try to figure it out on your guitar.

Using Scale Theory to Understand and Play Any Scale

Remember:

(1) the major scale tone pattern goes: whole, whole, semi, whole, whole, whole, semi (i.e. 2 wholes, 1 semi, 3 wholes, 1 semi)

(2) the minor scale tone pattern goes: whole, semi, whole, whole, semi, whole, whole (i.e. 1 whole, 1 semi, 2 wholes, 1 semi, 2 wholes)

Try a major scale, initially on a single string (low E) just to see how it works. We’ll play the scale of E major: E___F#___G#.A___B___C#___D#.E

E    open string

↓ whole tone (2nd fret after E)
F#  2nd fret

↓ whole tone (2nd fret after F#)
G#  4th fret

↓ semitone (fret immediately adjacent to G#)
A     5th fret)

↓ whole tone (2nd fret after A)
B     7th fret

↓ whole tone (2nd fret after B)
C#  9th fret)

↓ whole tone (2nd fret after C#)
D#  11th fret

↓ semitone (fret immediately adjacent to D#)
    12th fret

See how the tone distance pattern dictates the fretting pattern? The theory matches up to the actual movements on the guitar. This pattern will be the same for any major scale (no matter where you start on the fretboard). Try it out.

Of course, economy of movement dictates that guitarists don’t actually play scales on a single string: it requires too much moving up and down the neck. Instead, they play the same sequence of notes, but by hopping from one string to the next, increasing in pitch, in a predictable pattern.

In the next scale tutorials, we’ll learn the theory of pentatonic scales, and how to play the simplest pattern for the simplest scale (the minor pentatonic), which also happens to be a very practically useful scale.

Any comments or questions? Please let me know! Tweet at me (@acnotesblog), find me on Facebook, or leave a comment below.

Happy playing!

P.S. Answer: there are 2 octaves separating the open low E and open high E strings. Don’t be discouraged if you couldn’t get the answer this time – if you are properly new to music this question may have been a little advanced.

P.P.S. Song of the day: Clearest Blue by Chvrches

If you like Clearest Blue, please consider helping to support Acoustic Notes by getting it here.

RELATED POSTS

tones and major scales

minor scales

pentatonic scale theory

playing the minor pentatonic

Something new: finger-picking

Up to now we’ve focused on chords, in which all the notes are stacked on top of each other and played (strummed) pretty much simultaneously.

Today we’ll look at playing notes individually, and how this technique is used in songs.

Remember when I talked about hitting a bit of a wall and not feeling like I was making any real progress despite learning new chords? The properly new thing that got me past that plateau was finger-picking.

Fingerstyle guitar (especially on a classical guitar) makes the music sound less like rock or pop, and provides a more honest, folk-y quality. If you’ve been listening to the Acoustic Notes songs of the day, you’ve probably realised that this is something I’m quite fond of.

Before we start, some quick ground rules for the right hand:

  • the thumb plays the three lower-pitched strings (the ‘bass’ strings: low E, A, and D)
  • the other three fingers play the three higher-pitched strings (the ‘treble’ strings: G, B, and high E); one finger for each string

Although these are the traditional guidelines, it’s not uncommon for guitarists to develop their own styles, such as using only the thumb on all the strings, or alternating the index and middle finger on the treble strings.

Although specific fingerstyle patterns do exist, I didn’t know that at the time I first tried this out, so we’ll come back to it later. For now, try these two simple things:

(1) First play a chord you already know. Now, instead of strumming it, play each string individually, starting from the root (lowest-pitched first note of the chord). Try this with all your favourite chords, and play around a little bit to see if you can find a pattern of notes you like.

(2) Use free online tabs to play some great songs. These tabs look a little different to the chord block diagrams we’ve been using, but they are quite easy to read. Let’s walk through an example:

tracychapmanfingerintro

Here, the dashed lines represent the strings (with high e at the top). The numbers represent frets. In this example: fret in the 3rd fret of the A-string and simultaneously play that string as well as the open G and B strings. The ‘h’ notation means ‘hammer’: putting your finger down on the string hard enough to make it ring out (there’s is also a ‘p’ notation which means ‘pull off’: removing your finger forcefully enough to make the string ring out). So now: fret hard in the first fret of the B string, then play the open string. Then fret in the 3rd fret of the low E and B strings, and play both simultaneously. Etc.

My introduction to finger-picking consisted of attempting to play two songs I love dearly:

Tracy Chapman’s Fast Car (tabs here)

Sting’s Shape of My Heart (tabs here)

If you want to start with something simpler, you could try:

Simon and Garfunkel’s Scarborough Fair (tabs here)

R.E.M.’s Everybody Hurts (tabs here)

The Beatles’ Blackbird (tabs here)

I think that the most important thing is probably just to pick a song you really love. That’s what will motivate you to keep going until you get it right (and probably until you’ve learned it by heart and can play and sing it at various gatherings).

Which songs would you recommend for fingerstyle guitar? Tweet at me (@acnotesblog), find me on Facebook (www.facebook.com/acnotesblog), or leave a comment.

Happy playing!

P.S. Song of the day: Play by Flunk

If you like Play, please consider helping to support Acoustic Notes by getting it here.

Music theory: tones & major scales

Music Theory: What is it Good For?

You might be asking yourself: why scales? Why should I bother learning about music theory?

Well, I obviously can’t force you if you’re not into it. But there are some very good reasons to understand scales and their underlying theory, including:

(a) scales help you work out where all the notes are on the fretboard, which means you organically learn their positions

(b) correct scale practice improves your technique and your playing

(c) understanding the nature of scales is a kind of musical short-hand for knowing which notes to use when you want to achieve a particular style of sound (e.g. blues, traditional Asian, ‘Arabian’, Latin-sounding, etc.)

If you’ve ever wanted to be able to just jam with other musicians, knowledge of scales builds the required improvisation skills.

The more you understand and play different kinds of scales while listening to a variety of musical styles, the more you will start internalising the sonic character of specific scales, and understanding how to achieve sounds similar to your favourite types of music.

I personally don’t think you need to worry about being constrained by the “rules” of music theory. When you are creating your own music, you can and should absolutely rely on your innate instincts and preferences rather than the rules. I treat music theory more as a set of guidelines, which can really help you resolve some of the problems you might run into when you’re trying to write music.

You might be interested in this video from Michael New (how knowledge of the theory might influence your music):

If you don’t want to learn more about music theory, feel free to skip past my theory posts (this may mean you won’t fully understand some of the explanations or references in future posts). Alternatively, if you’d prefer to learn theory on your own, at your own pace, you could try some popular music theory books (e.g. Music Theory For Dummies, or Music Theory: from Absolute Beginner to Expert).

Scales: Not Just for Fish

The notes on a piano keyboard (unlike on a fretboard) are nicely laid out in a linear pattern, and the keys are thoughtfully colour-coded in black and white. This makes it much easier to learn theory using a piano, so I will rely heavily on keyboard-based explanations in this tutorial. But! you don’t need to know anything about piano to start with, and all of the information is universally applicable to all musical instruments (including guitar), I promise!

As mentioned previously, there are seven basic musical notes: A, B, C, D, E, F, and G.

Starting on C and playing the next eight notes in order (C D E F G A B C) is – from a music theory perspective – the simplest version of a one-octave scale. A scale can be played upwards (increasing in pitch) or downwards (decreasing in pitch). It is just a pattern of ascending or descending notes: you climb (‘scale’) up or down the notes.

You can see a C scale played on piano in the first half of this video:

This is actually the C major scale: its root (or ‘tonic’) note is C, and it sounds cheerful and happy. Major scales are essential to Western music. If you’ve heard someone sing do-re-mi-fa-so-la-ti-do, that is exactly what these types of major scales sound like. They sound kind of basic and cheesy, and evoke happy and pleasant feelings.

C major contains no ‘sharps’ or ‘flats’. To understand what sharps and flats are, we first need to understand tones.

In the video, only the white keys on the keyboard are played during the C major scale. Black keys exist between some of the white keys, but none of them are played. The positions of the notes/keys on the piano keyboard look like this:

keyboard

Going from one white key to the next by jumping over the neighbouring black key will change the pitch by a whole step (‘whole tone’). Going from a white key directly to the neighbouring black key (or directly to the neighbouring white key when there is no black key to jump over) will change the pitch by half a step (a ‘semitone’). Two semitones make up a whole tone.

halfstepssemitones

Image credit: http://www.allaboutmusictheory.com

Listen to the sound of a whole tone pitch change on your guitar: play the open low E string. Now fret that string in the 2nd fret and play it (which produces an F-‘sharp’). Now alternate between the two.

Then listen to the sound of a semi-tone pitch change on your guitar: play the open low E string. Now fret that string in the 1st fret and play it (which produces an F). Now alternate between the two (which, incidentally, produces the Jaws theme).

Can you hear the difference? The whole tone pitch change is twice as large as the semitone pitch change.

Ok, let’s get back to scales so we can apply this pitch change idea to the ‘sharpening’ and ‘flattening’ of notes. The pattern of tone distances between the notes in every major scale goes: whole, whole, semi, whole, whole, whole, semi.

C__D__E_F__G__A__B_C

1__2__3_4__5__6__7_8

(match this up to the keyboard above to make sure you understand)

Notice that the keyboard contains no black keys between E and F, nor between B and C: in C major, these form the two naturally-occuring half steps required by the pattern of tone distances in a major scale.

If a major scale is started on the note F (instead of C), B must be lowered by a semitone (to B-minus-a-half) to fit the required pattern of major scale tone distances (and to achieve the same sonic character and feel as every other major scale). Watch the first half of this video to see the F major scale:

Raising any note by a semitone ‘sharpens’ its pitch, and lowering any note by a semitone ‘flattens’ its pitch. The F major scale requires a B-flat (Bb) to sound *right*. The notation for a sharpened note is ‘#’ (more on this in the next post).

You made it! That’s all for today. I hope you aren’t too overwhelmed by the theory. Let me know in the comments what was helpful, what was difficult to understand, and if you have any additional questions. I’d love to hear from you!

Happy playing!

P.S. Bonus song of the day: Sittin’ on The Dock of the Bay by Otis Redding and Steve Cropper (or watch a Sara Bareilles cover here)

If you like The Dock of the Bay, please consider helping to support Acoustic Notes by getting it here (original) or here (cover).

RELATED POSTS

minor scales

applying tones and scales: understanding the fretboard

Chords: more 7ths

Today’s 7th chords all require 3 finger positions, and are very reminiscent of chords you already know. Here they are:

amaj7

A major 7th (Amaj7) extremely similar to A major: the middle position just moves from the 2nd to the 1st fret to make a kind of V-shape. Your fingers go: 1st finger on the G string, 1st fret; 2nd finger on the D string, 2nd fret; 3rd finger on the B string, 2nd fret. Play all the strings except for low E.

d7

D dominant 7th (D7) literally a mirror-image of D major. Your fingers go: 1st finger on the B string, 1st fret; 2nd finger on the G string, 2nd fret; 3rd finger on the high E string, 2nd fret. Play all the strings except for low E and A.

dmaj7

D major 7th (Dmaj7) make the A shape again, then move it over one string position so that your fingers go: 1st/2nd finger on the G string, 2nd fret; 2nd/3rd finger on the B string, 2nd fret; and 3rd/4th finger on the high E string, 2nd fret. Alternatively, barre (i.e. fret across) all three of these strings with your 1st finger, in the 2nd fret (as shown in the diagram above). This is good basic practice for the upcoming post on barre chords. Play all the strings except for low E and A.

emaj7

E major 7th (Emaj7) extremely similar to E major: the middle position just moves from the 2nd to the 1st fret. Your fingers go: 1st finger on the D string, 1st fret; 2nd finger on the G string, 1st fret; 3rd finger on the A string, 2nd fret. Play all the strings.

In the next tutorial, the final set of open 7th chords (for now).

Happy playing!

P.S. Bonus song of the day: Run by Collective Soul

If you like Run, please consider supporting Acoustic Notes by getting it here.

RELATED POSTS

chords #1

chords #2

chords #3

chords: 7ths

chords: even more 7ths

basic rhythm: preparation for strumming

Overcoming a Plateau

You’re probably getting a little sick of chords by now.

The Problem

Maybe, when you first started following these tutorials, it was really satisfying learning chords for the first time – even putting them together to play popular songs. But now that you know how to play chords, learning new chords doesn’t provide quite the same satisfaction that it used to.

Our neurological reward systems adapt: to situations, to love, to learning. Depending on the context, this trait can be both adaptive and maladaptive. It keeps us going through difficult situations and facilitates creative solutions, but also drives a continuous search for novelty and progress that is in direct opposition to the human need for familiarity and security. It’s not easy to strike the right balance.

The impatience to learn something ‘more than just chords’ results from making what’s known as ‘horizontal’ – rather than ‘vertical’ – progress. Near the start, I passed through a kind of motivational purgatory: after the initial high of realising I could actually play guitar chords. Was guitar-playing really not as mysterious and difficult as I had believed? I still wanted to play, but it felt like: “well, now I know I can do this – where’s the challenge?”. It was unclear where I should go from there in order to break through the plateau and keep making vertical progress.

The Solution

So I spoke to my lovely friend, A, who has some experience with the guitar. I don’t have a predictable enough schedule to commit to formal guitar lessons, and also had my heart set on trying to teach myself. He wisely reminded me of what our school piano syllabi entailed: lots of scale practice, music theory, sight-reading, and learning and practicing new techniques and pieces every time we levelled up a grade.

He also recommended a book he had found useful, which is where I discovered the horizontal vs. vertical progress concept. Realising that this was a problem faced by every guitarist made me feel much less discouraged. The very next day I learned something properly new (which I’ll talk about in an upcoming post), and got excited all over again.

So, if you’ve been feeling a little impatient, you’ll be happy to hear that there are only two more short open chord tutorials before we move on. I do have to stress, though – as much for myself as for anyone else – that even though it feels much easier to learn and play new chords now, humans are prone to laziness when things feel easy. That is exactly when extra effort should be made to focus our attention, memorise new chords properly, and employ the correct technique to play them.

Try playing through all the minor, major, and 7th variations of the A, B, C, D, E, F, and G chords you’ve learned so far, in order. Take note of where you have trouble: with finger placement/pressure, with chord changes, or with anything else. Figure out why you’re having trouble, and slow down enough so that you can correct it. Practice in this slow, intentional, and correct way; until it becomes second nature. The more we practice with an incorrect technique, the more the incorrect neural pathways are strengthened (like a grooves in a piece of paper that’s continually folded the same way), making it much harder to correct these habits later on.

If you find you really do know all the chords by heart, and are happy that there are no sticking points, high fives! It’s time to learn the next chord set.

Happy playing!

P.S. Song of the day: Dirty Paws by Of Monsters and Men

If you like Dirty Paws, please consider helping to support Acoustic Notes by getting it here.

RELATED POSTS

jumping the first hurdle

Chords: 7ths

I hope you liked B7 from the last chord tutorial, because today is all about 7th chords.

Again, don’t worry about exactly what a 7th chord is for now: the next few tutorial posts will cover scales and chords in more (but hopefully accessible) detail.

All of today’s 7th chords are really easy, requiring hardly any new information, only two fretting fingers, and no difficult stretching:

a7

A dominant 7th (A7) this is *just* like A – which you already know – but without the middle-position finger. Your fingers go: 2nd finger on the D string, 2nd fret; 3rd finger on the B string, 2nd fret. Play all the strings except low E.

am7

A minor 7th (Am7) *just* like Am, but without the middle-position finger. Your fingers go: 1st finger on the B string, 1st fret; 2nd finger on the D string, 2nd fret. Play all the strings except low E.

cmaj7

C major 7th (Cmaj7) *just* like C, but without the first finger’s position. Your fingers go: 2nd finger on the D string, 2nd fret; 3rd finger on the A string, 3rd fret. Play all the strings except low E.

e7

E dominant 7th (E7) *just like E, but without the middle-position finger. Your fingers go: 1st finger on the G string, 1st fret; 2nd finger on the A string, 2nd fret. Play all the strings.

You already know the drill regarding memorising chord shapes and practicing switching between them, so I’m going to stop boring you by repeating those instructions in every chord tutorial.

Since the theory behind chords is still a post or two away, I’ll leave you with a tantalising question: how does the emotional feel of a dominant, major, or minor 7th differ from that of the regular major and minor chords you already know?

How have you been finding the chord tutorials? Too easy? Too difficult? Let me know in the comments, and remember to follow Acoustic Notes on Twitter (@acnotesblog) or Facebook to be notified when new posts go up!

Happy playing!

P.S. Song of the day: Runaway by Mr Little Jeans

If you like Runaway, please consider helping to support this blog by getting it here.

RELATED POSTS

chords #1

chords #2

chords #3

chords: more 7ths

chords: even more 7ths

basic rhythm: preparation for strumming

Preparing to Play: Tuning

It’s time to tune our guitars! The last step before we can actually start playing.

There are multiple ways to tune a guitar. You can tune each string to an existing frequency (e.g. by comparison with notes played on another instrument like a piano, the display on a tuner, the sound of a tuning fork, or by perfect pitch, if you are lucky enough to have it; test yourself here), or you can tune the strings relative to each other.

The latter method will result in an instrument that is in tune with itself, but not necessarily with other instruments (unless you started with a tuning fork). It’s also the easiest method to use in a post-apocalyptic-type situation (where there may be no pianos, tuners, apps, or YouTube videos handy). At least that way you can still play the guitar around a campfire with your survival buddies.

Remember that the lowest-pitched string is low E. For reasons that will become clear when we talk about scales in a future post, if you fret the fifth fret of the low E string, you will produce a note that is the same distance above E as an A, the next string, which you can then tune to match the fifth-fretted E pitch. Your guitar may have dots on the upper edge of the fretboard (or inlays on the frets themselves) to indicate the fifth (and other) frets.

Then, fretting the fifth fret of the tuned A string will produce a note the same distance above A as a D; you can then tune the next string (D) to match this pitch. Fretting the fifth fret of the tuned D string then allows you to tune the G string, fretting the fourth fret of the tuned G string allows you to tune the B string, and fretting the fifth fret of the tuned B string allows you to tune the high E string. As a quality-control measure, check that your low and high Es match in sonic character.

Your guitar is now tuned, but you will have to re-check the tuning at each session. Let’s play!

P.S. Bonus song of the day: Breathe Me by the incomparable Sia (YouTube version here)

If you like Breath Me, please consdier helping to support Acoustic Notes by getting it here.

RELATED POSTS

guitar anatomy and string stuff

strings, frets, and notes

Preparing to Play: Strings, Frets, & Notes

A quick tour of the frets and strings will set us up to tune our guitars.

If you hold a six-stringed guitar in the manner described in the last three posts (correct posture, left hand position, and right hand position):

  • the frets are numbered starting from one (just proximal to the nut), and increasing by one after each fret bar closer to the sound hole (‘higher up’) you get
  • the strings are numbered as follows (from bottom to top): 1, 2, 3, 4, 5, 6
  • string identities are as follows (from top to bottom): low E, A, D, G, B, high E (i.e. the first string is high E, and the sixth string is low E). The mnemonic “Eddie Ate Dynamite, Good Bye Eddie” may be helpful at first.

What do these identity letters mean? If you already have a background in music theory (the language, grammar, and punctuation of music), you can skip to the next post.

A Primer on Musical Notes

Sound is produced by vibration (e.g. of a string on a guitar). The faster (higher frequency) the vibration, the higher-pitched the resulting sound.

Musicians assign each pitch (note) an alphabetic name. There are seven notes in order of ascending pitch: A, B, C, D, E, F, and G. The notes don’t stop at G: you can keep increasing the pitch. BUT! the next note after G is named A again, because – although it has a higher pitch – it has the same sonic character as the starting A. Specifically, the higher A is the eighth note above the starting A: it is an ‘octave’ higher.

To demonstrate how notes an octave away from each other share the same sonic character, pick up a tuned guitar and play the low E and high E strings separately, then simultaneously. Now try playing an E string and any other string separately, then simultaneously. The E’s sound the same as each other.

No matter how low down or high up you are on a keyboard or fretboard, the distance (‘interval’) between one note and the next note with the same name (e.g. from A to A) is always an octave.

String length, tension, diameter, and density all affect vibration frequency: shorter, tighter, thinner, lower density strings vibrate at a higher frequency (producing a higher-pitched sound), and vice versa. All the strings on a guitar are of an equal length (they travel the same distance from the nut to the bridge). However, they do have different diameters and densities to help them achieve their intended/desired pitch when their tension is altered via the tuning pegs.

Play an open (un-fretted) string on a tuned guitar (the low E, for instance). The pitch is low because a relatively relaxed string vibrates relatively slowly. The pitch of the high E string is much higher, because its higher tension produces a faster vibration.

When you fret a string, you effectively shorten it, which increases pitch. Shortening any vibrating string to exactly half its original length produces an octave’s worth of pitch increase. Shortening a string by less than half produces proportionally less of a pitch increase. Notice how the tighter you wind a string (i.e. the higher its tension), and the higher up you fret it (i.e. the shorter its length), the higher the pitch gets.

Shortening a vibrating string to increase pitch is analogous to a phenomenon you have undoubtedly already encountered: reducing the volume of water in a vibrating glass (the less water in a glass, the faster it is able to vibrate, and the higher the resulting pitch). Check out this mesmerising video of a guy playing Leonard Cohen’s Hallelujah using only water glasses:

Voice Pitch

These principles of vibration also explain gender-based voice pitch differences. Testosterone causes vocal chords to become thicker and longer, which can drop voice pitch by as much as an octave. Why have humans evolved this way? It’s thought that deep male voices were selected for over large timescales because they are more intimidating to other males. Some studies also report that women find lower-pitched male voices more attractive (and vice versa), but other studies fail to replicate this. Although lower voices don’t correlate with testosterone level, they do correlate with a lower cortisol level: women may use voice as a proxy for the physiological health of potential mates. You can listen to the ideal (digital) male and female voices identified by one study here.

I do also remember another study in which aging women tended to lose their ability to hear lower pitches, while men tended to lose their ability to hear higher pitches. So basically heterosexual couples will be sitting around in their old age thinking their partners never listen. Except, hopefully, to each other’s guitar music 😉

P.S. Song of the day: Heartbeats by Jose Gonzalez

If you like Heartbeats, please consider helping to support this blog by getting it here.

RELATED POSTS

guitar anatomy and string stuff

tuning the guitar

Preparing to Play: The Right Hand

On the Right

As I mentioned in the previous post, your right (strumming) hand and wrist should be relaxed, floating comfortably near the sound hole. The 90-degree angle facilitates maximal force when drawing the strings (in the same way that drawing the string of a bowed weapon occurs perpendicularly to the string). Since I have yet to figure it out myself and am currently just doing what comes naturally, I will cover strumming in a separate post.

For now, thought, let’s consider finger-picking (I am playing sans pick). Strings are played by tugging them with the tips of the fingers, over the sound hole. Most commonly, the positionally superior three strings (the bass strings) are played using the thumb, while the positionally inferior three strings (the treble strings) are played using the other fingers (forefinger: 3rd string, middle finger: 2nd string, little finger: 1st string). I will cover string and fret identities and numbering in the next post. Keep your wrist relaxedly arched slightly away from the guitar’s body.

Don’t Rush It

Getting to grips with classical guitar takes time. It’s not a skill you can learn overnight, but then: which skills worth learning are?

Proper finger positioning and technique can only come with practise, since the muscles in your hand and arm need a chance to adapt to this strange new mode of usage. I can say from my experience with the piano that it’s definitely easier to develop the right habits from the start than to correct them later. But do take a rest from practise if your hands ache or cramp. I haven’t experienced this yet, apart from some mild fingertip hypoaesthesia from pressing onto the strings, but maybe advanced chords will test my hand muscles more extensively.

Rest is good: just as muscles strengthen in the periods between weight-lifting, muscles, tendons, and nerves adjust to the demands of guitar-playing partly between practise sessions. It’s also during down-time that we consolidate learning memories, and have time to look forward to the next practise session.

Two more posts (strings and frets, tuning) before we’re ready to start playing!

P.S. Bonus song of the day: Kusanagi by ODESZA (YouTube version here).

If you like Kusanagi, please consider helping to support Acoustic Notes by getting the regular version here or the instrumental version here.

RELATED POSTS

correct posture

left hand positioning