
Up to now we’ve focused on chords, in which all the notes are stacked on top of each other and played (strummed) pretty much simultaneously.
Today we’ll look at playing notes individually, and how this technique is used in songs.
Remember when I talked about hitting a bit of a wall and not feeling like I was making any real progress despite learning new chords? The properly new thing that got me past that plateau was finger-picking.
Fingerstyle guitar (especially on a classical guitar) makes the music sound less like rock or pop, and provides a more honest, folk-y quality. If you’ve been listening to the Acoustic Notes songs of the day, you’ve probably realised that this is something I’m quite fond of.
Before we start, some quick ground rules for the right hand:
- the thumb plays the three lower-pitched strings (the ‘bass’ strings: low E, A, and D)
- the other three fingers play the three higher-pitched strings (the ‘treble’ strings: G, B, and high E); one finger for each string
Although these are the traditional guidelines, it’s not uncommon for guitarists to develop their own styles, such as using only the thumb on all the strings, or alternating the index and middle finger on the treble strings.
Although specific fingerstyle patterns do exist, I didn’t know that at the time I first tried this out, so we’ll come back to it later. For now, try these two simple things:
(1) First play a chord you already know. Now, instead of strumming it, play each string individually, starting from the root (lowest-pitched first note of the chord). Try this with all your favourite chords, and play around a little bit to see if you can find a pattern of notes you like.
(2) Use free online tabs to play some great songs. These tabs look a little different to the chord block diagrams we’ve been using, but they are quite easy to read. Let’s walk through an example:
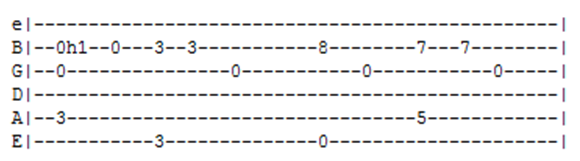
Here, the dashed lines represent the strings (with high e at the top). The numbers represent frets. In this example: fret in the 3rd fret of the A-string and simultaneously play that string as well as the open G and B strings. The ‘h’ notation means ‘hammer’: putting your finger down on the string hard enough to make it ring out (there’s is also a ‘p’ notation which means ‘pull off’: removing your finger forcefully enough to make the string ring out). So now: fret hard in the first fret of the B string, then play the open string. Then fret in the 3rd fret of the low E and B strings, and play both simultaneously. Etc.
My introduction to finger-picking consisted of attempting to play two songs I love dearly:
Tracy Chapman’s Fast Car (tabs here)
Sting’s Shape of My Heart (tabs here)
If you want to start with something simpler, you could try:
Simon and Garfunkel’s Scarborough Fair (tabs here)
R.E.M.’s Everybody Hurts (tabs here)
The Beatles’ Blackbird (tabs here)
I think that the most important thing is probably just to pick a song you really love. That’s what will motivate you to keep going until you get it right (and probably until you’ve learned it by heart and can play and sing it at various gatherings).
Which songs would you recommend for fingerstyle guitar? Tweet at me (@acnotesblog), find me on Facebook (www.facebook.com/acnotesblog), or leave a comment.
Happy playing!
P.S. Song of the day: Play by Flunk
If you like Play, please consider helping to support Acoustic Notes by getting it here.

2 thoughts on “Something new: finger-picking”